
Step 1: Go to aws.amazon.com

Step 2: Click on "Sign In to the Console"

Step 3: Click on "Create a new AWS account"

Step 4: Give AWS an email address and your name and then click "Verify email address"

Step 5: Check email for verification code, put it in, and click "Verify"

Step 6: Set password for account and hit "Continue"

Step 7.1: Set account for personal or buisness use

Step 7.2: Put your full legal name

Step 7.3: Put your phone number
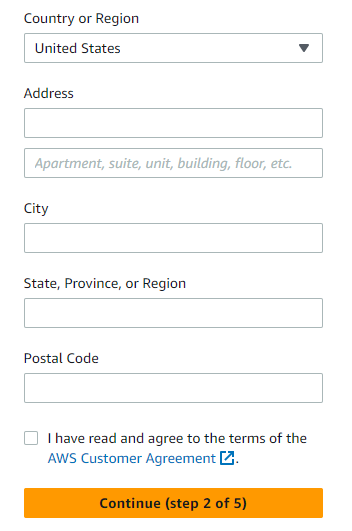
Step 7.4: Put in your address, agree to the terms and conditions, and click "Continue"

Step 8: Put in your credit card details (this is not free after 12 months, folks!) and click "Continue"

Step 9.1: Put in your phone number and the captcha code and then click "Send SMS"

Step 9.2: Enter the code that Amazon sent to your phone and click "Continue"

Step 10: Leave everything the same and click "Complete sign up"
Step 11: Go back to aws.amazon.com and click "Sign In to the Console"

Step 12.1: Put in your email and click "Next"

Step 12.2: Enter your password and click "Sign in"
You have finished the sign up process for Amazon Web Services! Continue on to the next step of setting up a EC2 instance!
Home EC2 Setup Server Setup About the Author